Many townspeople try to go to summer cottages in the summer to relax, breathe fresh air, and at the same time work on the ground. In addition to the garden house in the summer cottage, it is desirable to have a garage, which houses not only a car, but also various garden tools, equipment, and power tools. Many summer residents use this room as a workshop, placing machines and other devices near the walls. As the saying goes, there would be a garage, and the zealous owner will always find application for it. It is possible to build a garage at the cottage with your own hands from various materials: timber, brick, foam blocks, cinder blocks, etc. With independent construction work, it is possible to reduce the cost of construction, decently saving on paying for the services of the construction team. A person with little experience in construction, and having free time, can cope with this task. The process will accelerate significantly if you call for help from several friends.
The choice of building materials for the construction of a garage
The garage can be wooden, metal or stone. Metal garages are assembled very quickly from the finished kit, although it will require the help of an experienced welder. Such structures need additional insulation if they are planned to be used in winter. The most widespread are garages made of stone materials:
- bricks;
- gas silicate blocks (gas blocks);
- foam concrete blocks (foam blocks);
- slag concrete blocks (slag blocks).
Stone buildings are the most reliable, because they are called capital.

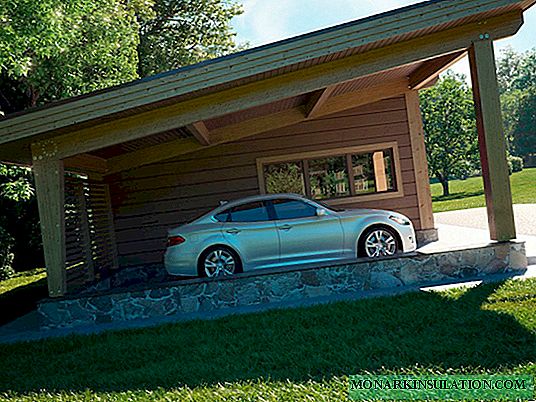
A stylish wooden garage, built on a summer cottage site with your own hands, can perfectly fit into the overall design of the countryside

A metal garage, purchased in a collapsible form, is assembled in a summer cottage in a few days with the active participation of an experienced welder
The main stages of the construction of the garage
Any construction requires preparation, during which a project of the object is developed, all the necessary materials are purchased, earthwork is carried out and further on the list. Let's consider each stage separately.
The first stage: the development of the project in a simplified form
Before you build a garage for a summer residence, you need to mentally imagine the future structure and draw a small diagram of the project on a piece of paper. Of course, you can order technical documentation from professional designers, but then you will have to forget about saving, since the services of these specialists are not cheap. The garage is not a work of architecture, so you can design this object yourself. In this case, determine the answers to a number of questions:
- For what purpose is a garage being built? Only to provide parking space? If you plan to carry out car repairs and maintenance, do you need a viewing hole? Do I need a cellar? Write down all the wishes on a piece of paper and consider them when developing a project plan.
- What sizes can have a garage, based on the available free space in the suburban area? The width of the structure, the length and, of course, the height are determined. If the garage is only needed for parking the car, then 3 m wide and 5.5 m long is enough. The height depends on the growth of the car owner, because most of all he will have to be in this room.

Sketch of a major garage built of brick, blocks and other stone materials, with a shed roof, small window openings, ventilation system
Second stage: a breakdown at the cottage
At this stage, they begin to transfer the schemes sketched on a piece of paper to the real area. In the professional language of the builders, this sounds like a "localization". They are determined with the location of one of the corners of the future garage and hammer in the first peg with a sledgehammer or heavy hammer.
Then, using measuring tools (tape measure, square), other angles are measured and the stakes are also driven in. A thin nylon cord is pulled between the pegs, which can go up to 40 meters, depending on the size of the garage.
As stakes, you can use 40-centimeter pieces of reinforcement with a diameter of 10-12 mm. It usually takes up to 10 pegs.
Stage Three: Earthwork
They begin the active construction of a garage in the country with the implementation of earthworks, during which a trench is excavated for pouring the strip foundation. The width of the trench is usually 40 cm, the depth depends on the degree of freezing of the soil in the area. An insufficiently buried foundation can cause cracks in the walls of the garage and other damages. In some regions, 60 cm is enough, while in others it will be necessary to dig twice as deep.
So that the bottom of the trench excavated for the foundation is not loose, the soil is selected to a layer with a natural density (that is, the soil in this place should not be bulk). The walls of the trench are carefully treated with a shovel, achieving their evenness and verticality.
The fourth stage: pouring the strip foundation
Of all the types of foundations, it is worth choosing a concrete version, since when pouring it, it is possible to reduce cement costs through the use of rubble stone. Work on the installation of a concrete foundation is carried out quite simply. A rubble stone is laid in rows in a dug trench, spilling each masonry with cement mortar. The operations are repeated until they fill the dug trench to the brim.

During the construction of a garage in the country, a concrete foundation is poured. On the diagram: 1. Waterproofing. 2. A blind area that prevents water from entering the foundation. 3. Crushed stone poured with cement-sand mortar
It is important to note that the strength of the foundation directly depends on the quality of the cement. So that the garage building does not shrink and is not covered with a web of cracks, it is necessary to purchase cement (Portland cement) not lower than grade 400.
To mix the solution, cement and sand are taken in a ratio of 1: 2.5. In other words, one and a half of the cement should account for two and a half parts of sand. Water is added gradually, achieving mobility of the solution. Water usually takes as much as cement.
Stage Five: installation of a basement, installation of gates, erection of walls
Along the entire perimeter of the trench, formwork is installed at the level, using planks for this, to fill the base with concrete mortar. If the construction site has not been leveled initially, then the highest point is taken as the basis for reading the base height. 10 cm is added to the base and the horizon is displayed. Two layers of waterproofing are laid on the dried surface of the cap, for which a roll of roofing material is used. Horizontal waterproofing protects the walls from the penetration of capillary moisture coming from the ground.
Before starting the construction of walls, it is necessary to install metal garage doors, which will be fixed in masonry. The strength of the connection between the door frame and the wall is ensured by embedded parts welded to it in the amount of four pieces on each side. As embedded parts, round rods are used, the diameter of which should be at least 10-12 mm. When masonry is performed, metal rods are sealed into seams.
By the way, do not forget to paint the surface of the gate, preferably in two layers, before starting installation. When installing, check the level of verticality of their position, if necessary, then lay flat stones or iron plates at the corners. The exposed gates are supported by wooden braces.
After completing the installation of the gate frame, they begin to lay out the walls of the garage using the method of chain masonry. At the same time, the seams of the previous row are overlapped by the next row of cinder blocks or other stone materials selected for the construction of the garage. In accordance with the technology, masonry always starts from the corners. Between the exposed adjacent corners pull a cord along which they put the remaining blocks in a row. Then again raise the corners, pull the cord again and lay out another row of blocks.

Using the building level when laying the walls of the garage with your own hands allows you to ensure the evenness of all surfaces, both in the vertical and horizontal directions
Using a plumb line, the verticality of the walls is periodically checked. Close attention is paid to the verticality of the corners. The horizontal position of the stacked rows is verified by the building level.
Overlapping the garage serves as its roof at the same time, so the end walls have different heights, which ensures the necessary slope of the roof, necessary for the drain of rainwater. The upper part of the side walls is also sloped, with a height difference of five cm per meter. The height of the front wall into which the garage doors are built is usually 2.5 meters, and the rear (blind) is 2 meters. If it is necessary to make the walls higher, the masonry needs reinforcement, which is provided by a metal mesh, laid on every fifth row.
The cement-sand mortar used for laying the walls of the garage is kneaded in the following ratio:
- 400 Portland cement bucket;
- four and a half buckets of sand.
Water is added until the solution acquires the consistency of thick sour cream. The plasticity of the cement-sand mixture will give ordinary clay or lime dough. Finished walls are rubbed with cement mortar or plaster, and then bleached with lime.

To carry out the laying of blocks at a height, scaffolds are used that must withstand the worker, several blocks and a container with a solution
Sixth stage: ceiling and roof
Overlapping is performed from steel I-beams, the height of which can be 100 - 120 mm. Such beams easily overlap the garage, the width of which does not exceed 6 meters. 20 cm is added to the width of the garage, thereby obtaining the length of the beam. 10 cm are inserted into the long wall of the beam, while the cinder blocks in the place of the supports are replaced with blocks made of monolithic concrete. The step of laying the beams is 80 cm.
Then the ceiling is "sewn up" with 40 mm boards along the lower shelves of the beams. Roofing material is spread on top of them, on which slag is poured, expanded clay or mineral wool slabs are laid. Next, a 35 mm cement screed is made, the surface of which must be carefully leveled.
After the screed has completely dried, it is smeared with a primer and covered with waterproof roofing material (for example, bicrost, rubemast, etc.) glued using mastic or by melting.
Read more about the arrangement of the roof here - a single-pitched option and a gable option.
Seventh stage: the device of the floor and blind areas
The garage floor must be concrete to support the weight of the machine. A layer of fine gravel or sand is poured onto a leveled earthen base, well tamped and poured with a 10-centimeter concrete screed. Concrete is prepared from cement, sand and small gravel (1: 2: 3). With the help of exposed beacons, they monitor the surface of the floor, preventing the appearance of mounds and depressions.
Outside the garage, a blind area is arranged around the perimeter, the width of which is half a meter. Also, the earthen base is covered with gravel, over which concrete 5 cm thick is poured. The blind area is built under a slight slope, contributing to the rapid removal of rainwater from the walls of the car garage.

The interior decoration of the garage depends on the preferences of the car owner and the availability of additional purposes for using the premises. Necessarily provided lighting and, if possible, heating
Step-by-step example videos
So you can, without rushing, build a garage in the country with your own hands. Performing work according to the plan and moving from stage to stage, you will be able to get a solid, reliable room for parking the car.