As the stationary pool is beautiful and useful in terms of recovery, it is just as difficult to maintain. Water must be constantly cleaned, filtered, disposed of from incoming debris. But if from above the structure is covered with a transparent, as if the construction of a pavilion soaring above the water, then maintenance becomes easier. Even those owners who mounted the bowl open, eventually build do-it-yourself pool pavilions over it.
Why is a pavilion necessary?
Having completed the pavilion to the pool, the owner will receive the following "bonuses":
- Water will evaporate less from the surface.
- Significantly reduce heat loss, which means the cost of heating water. In addition, it will lengthen the bathing season.
- Dirty sediments and wind-caused dust, debris, leaves will not get into the pool, and the owner will save on filtering and treating the water with chemicals (if the pavilion is closed).
- Ultraviolet rays will collide with the barrier and get into the pool already refracted. So, their destructive effect on the walls and bottom will become weaker, which will lead to an increase in the life of the pool materials.
- In winter frosts, the temperature under the pavilion is higher than on the street, which means that the structure will not have to pass tests at too low temperatures, which is why some materials and the water supply system may become unusable.
It will also be useful material on how to filter the water in the pool: //diz-cafe.com/voda/sposoby-filtracii-otkrytogo-bassejna.html
Rules for choosing the design of the pavilion
To build a pavilion for the pool with your own hands, you need to decide on its design.
Low pavilions
If the pool is used periodically, and the rest of the time it is idle, then the cheapest option would be a low pavilion with a height of no more than a meter. It will perform the most important function - protecting the water from the sun, rain and debris. And if the owners do not plan to dive from the sides, then it is enough to make a sliding section and through it fall into the water.

Low pavilions are convenient if the pool is used only in the summer season
There are also designs with a height of about two meters. For convenience of use, a door is mounted in them. This version of the pavilion is being made on the principle of an ordinary greenhouse using a metal profile and polycarbonate sheets. You can, of course, instead of polycarbonate pull a plastic film, but the aesthetic appearance will suffer from this, and the wear resistance of the film coating is weak.
High pavilions
The high pavilions are about three meters high and are used not only to protect the pool, but also serve as an excellent recreation area for the owners. The greenhouse climate allows you to arrange flower arrangements around the perimeter of the bowl, to put sun loungers or rocking chairs for relaxation. But this is if the borders of the pavilion are much wider than the size of the bowl.

The high pavilions replace the owners with traditional arbors, because they have enough space for relaxation and warm enough even in winter
A more economical option is the pavilion, which is built around the perimeter of the bowl, speaking a dozen centimeters. It can be fully closed or half-closed. The semi-closed version protects the bowl either only on one side (often from the side where the wind blows from), or from the ends, leaving the middle open, or from the sides, leaving the ends open. Such a pavilion will not provide maximum protection, but it will create a barrier for wind and garbage, and the owners will receive a shadow zone in which you can hide from the scorching sun.
And you can combine a bar and a summer kitchen with a pool, read about it: //diz-cafe.com/postroiki/kak-sovmestit-bar-s-bassejnom.html

The semi-enclosed pavilion protects only part of the pool, and it is better to mount it from the wind side or from green spaces
Sliding structures
In any pavilion of any height, a system of sliding sections increases the level of comfort. Their base is a rail system (as in commander cabinets), along which sections can move and go one after another. Having shifted them to one end, the owners receive an awning to create a shadow, and in case of precipitation they can quickly insulate the bowl.

Sliding or telescopic pavilions move along the rail system and can be completely removed from the water zone of the pool
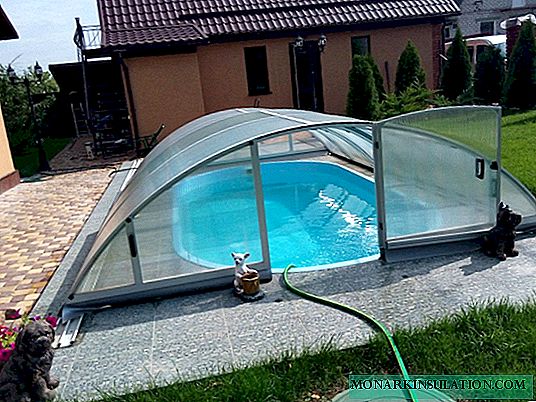
The choice of the shape of the pavilion depends on the bowl of the pool itself. For round bowls, dome-shaped models are used, for rectangular ones, in the form of the letter "P" or hemisphere. The most complex are irregularly shaped pools. For them create asymmetric "canopies".

For round bowls, the dome is considered the most successful form of the pavilion.
DIY Pavilion Technology
From an economic point of view, the creation of pavilions on their own is justified, but if you do not have experience, then the installation of a tall building can take several weeks. True, some summer residents simply do not have a choice, because for a bowl of non-standard shape it is not always possible to find the corresponding "roof". So, you have to buy materials yourself and build a pavilion. Let's see how to do this using the example of a semi-closed polycarbonate structure.
Determined with materials and form

The polycarbonate pavilion is assembled on the principle of an ordinary greenhouse
For coating we will use polycarbonate, which is usually covered with greenhouses. And with the frame we will make a profile pipe.
To minimize costs and simplify installation, we will make the structure open from the ends, put it on the foundation of the pool or its finish and leave the opportunity to disassemble for the winter.
Also, material on preserving the pool for the winter will be useful: //diz-cafe.com/voda/zimnyaya-konservaciya-bassejna.html
For swimming, high altitude is not necessary, therefore a two-meter pavilion is enough.
Fill the foundation
Despite the apparent lightness, polycarbonate and metal profile have considerable weight, so the base for the pavilion must be reliable. If a recreation area has already been created around the pool and tiles are laid out, then you can mount it directly on it.

From the construction of the pavilion, the foundation should protrude another 7 cm forward to reliably hold the entire load
The remaining owners will have to fill the foundation with a thickness of half a meter, the width of which should protrude from the base of the frame by about 7 cm to the sides. Concrete must be reinforced by laying out square cells with a side of 20 cm.

The foundation for the pavilion must be thick and strong, because the weight of the entire structure can reach tons or more
Create a wireframe
For the main arches of the frame, you need a wide pipe on which you can fix two edges of adjacent sheets of polycarbonate. Its length is 1 height (2 m) + the width of the pool.
The pipes must be arched. It is better to entrust it to specialists, and whoever has welding can do it themselves. We cut the part of the pipe that should bend from three sides with a circular saw, carefully bend it, fixing the edges in a vice, and then weld all the cuts. Grind the welding spots.
We fix the base of the frame to the foundation using bolts.

We attach the base of the frame to the foundation or finish of the pool with bolts
We set the arcs, also fixing with bolts and nuts (If the option is not separable - you can brew). The distance between the arcs is meter.

We fix all arcs to the base with bolts
Between the arcs we fix the stiffeners, alternating between 2 ribs, then 3 per span.

We take arcs on double bolts for reliability
The finished frame is treated with anti-corrosion agents and painted in the desired color.
Sheathed with polycarbonate
We mark on the polycarbonate sheets (the color and thickness of which you choose) the places where they will be attached to the pipes, and drill holes. They should be slightly larger than the thickness of the screws, because in the heat polycarbonate "plays", and there should be a margin for expansion.
We trim the finished frame with polycarbonate sheets. Sheets are fastened with self-tapping screws, and metal (galvanized!) Washers must be put under the caps to close the holes.

Butt sheets of carbonate should lie on the profile pipe butt
From the inside, we coat all the fasteners and joints with a sealant.

We lubricate all joints and fasteners with sealant
The concrete base must be insulated on both sides of the water and precipitation using decorative finishes with granite, tiles, etc.
Keep in mind that the more often you disassemble a structure, the faster it will wear out. So think about whether it makes sense to rent a pavilion before every winter. This is justified if only in the winter the cottage will be empty and no one will clear the snow from the pavilion in case of heavy snowfalls.