What materials can a do-it-yourself shop be made of? As practice shows, for the manufacture of a garden bench, you can choose any building material: natural or artificial. The most common material, of course, is wood. The simplest version of the bench consists of two chocks and a board nailed to them. For many summer residents and owners of private estates, not only the functional side of the matter is important, but also the aesthetic. After all, a shop should be pleasing to the eye, fit into the surrounding space, impress with its unusual design. In addition to wood, other materials are used, such as stone, metal, plastic, brick, concrete. At the same time, the seat and backrest, as a rule, are always made of wood, due to the unique properties of which the comfort and safety of using the bench for its intended purpose is ensured. Each owner can build a rest bench on his own site. The main thing is to have a desire, a set of tools and building materials that are purchased specifically or are in the "bins".
Option # 1 - pine beam bench
To build a convenient bench made of pine timber, designed for the simultaneous relaxation of three adults, you need to stock up on the following tools:
- hacksaw;
- an ax;
- electric plane;
- electric drill;
- a hammer;
- circular saw;
- with a screwdriver;
- tape measure.
At the base of the bench construction is a support beam made of a double pine beam, which is supported by a pair of legs-paws made of the same material. Ribs are nailed to the base, the shape of which contributes to a comfortable rest. Then the backrest and seat frame is sheathed with bars, which after processing are painted with acrylics or varnished (there should be no resinous knots on the surface of the pine beams that go to the seat trim).
It may also be about how to make a wooden street table for a summer residence: //diz-cafe.com/postroiki/derevyannyj-stol-dlya-dachi-svoimi-rukami.html

A wide bench with a comfortable back: the first photo shows the general view of the product, and the second shows a close-up of the base of the double beam
To make a base beam, saw off two beams so that each of them is 1700 mm long. For the legs you will also need to saw off two pieces of timber with a length of 600 mm. With the help of an ax, stitch decorative chamfers in the legs. Next, expose the legs to the beam and secure them with nails, as well as brackets, which you yourself make from a 6 mm knitting wire.
The next step is to saw off the edges of the frame in accordance with the dimensions calculated in advance when preparing the sketch of the bench. Using a hacksaw and an ax, give the ribs an ergonomic shape that matches the dimensions of the workpiece. Fasten the ribs of the seat and back with each other using nails (120 mm), additionally pull them together with brackets. Then set the ribs on the double beam of the base and nail with 150 mm nails. In addition, brace the parts. After that, paint the bench frame with white acrylic paint and allow the applied coating to dry.
At the last stage of work, saw a blank of twenty crimp bars with a circular saw, not forgetting the allowances necessary for processing. In this case, the length of the bars should be 2000 mm, the width - 62 mm, and, accordingly, the height - 22 mm. Cut off each blank with an electric planer, and then cover with colored varnish. On the dried bench base, lay the prepared bars, leaving a small distance between them for the drain of rain water. Fasten each bar with wood screws using a cordless screwdriver. A homemade bench, despite its massiveness, can be difficult, but still, put in any place in the garden. This shop is suitable for installation in a summer arbor.
You can learn more about how to build a gazebo with your own hands from the material: //diz-cafe.com/postroiki/besedki-dlya-dachi.html
Option # 2 - a bench made of fancy snags
To build such a shop with your own hands, you need to have an artistic taste and rich imagination. Not everyone will be able to see the outlines of the future creation in intricately curved trunks and tree branches. Stumps appear in the form of thrones, varnished wood saw cuts, mounted on ornate legs, serve as a table, and some unprecedented animals frame the bench. Having established such a bench on the territory of a country house or summer cottage, you can be 100% sure that the second such instance does not exist in nature. For the sake of such a feeling of uniqueness and originality, you can wander through the forest and look for suitable natural material.

A unique bench made of natural material is made in a single copy by a person who can make out a work of art in ordinary snags
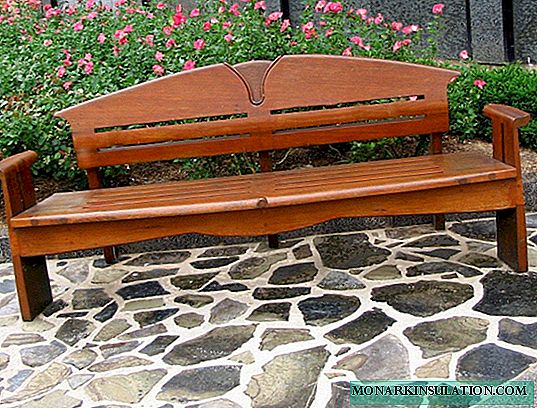
Option # 3 - carved shop with armrests
Do you want a lightweight bench equipped with armrests and wood carvings to appear on your site? Then prepare several boards with a section of 40 by 180 mm and 25 by 180 mm. Check the availability of the necessary tools: an electric drill, a jigsaw, a milling machine, a screwdriver, a grinding machine, a lathe, as well as consumables: PVA glue, yacht varnish and screws.

Schematic representation of the bench, which indicates the approximate dimensions of the main parts. This shop is manufactured using a power tool that allows you to accelerate the progress of finishing and assembly work.
Production of side trusses and support bars
From the cardboard, cut out the sidewall template, according to which make four identical parts from boards with a section of 40 by 180 mm. Drill three holes with a core drill in these parts using a saw thread so that each diameter is 54 mm. The holes should form a shamrock located in the center of the sidewall. Using the same drill, make a hole in the bottom of the side parts so as to partially repeat the trefoil ornament. Next, saw a half circle with a radius of 50 mm with a jigsaw. Also, decorate the front and rear edges of the sidewalls with semicircular recesses by sawing the corresponding holes with a jigsaw. Connect the sidewall parts in pairs, gluing them with PVA glue and additionally pulling together with two self-tapping screws (8 to 120 mm).
Stability of the bench is provided by supporting bars, for the manufacture of which it is necessary to take a 40 mm thick board. The support bars are treated with a milling machine, and then with a belt grinder. Carry out the last operation strictly in the direction of the wood fibers. After completing the grinding process for the sidewalls, mill their edges. Perform the exact same operation around the perimeter of the trefoil and the lower ornament.
Important! Perform milling in two steps to get improved finish. First set the cutter to a height of 6 or 8 mm. Then go through again, but set the cutter to a height of 10 mm.
Making the rest of the bench
The seat and back are made of thinner boards, the thickness of which is only 25 mm. In this case, for each element there are two boards with a length of 1250 mm. Only for seating two boards with a width of 180 mm are taken, and for the back - one board is the same, and the second is 30 mm narrower.
Then proceed with the manufacture of the armrests and lower supports of the bench. At the armrests, do not forget to carve a boss with a diameter of 25 mm, located on the side of the part attaching to the back. Grind and mill all parts.

Step-by-step processing of details of a carved wooden bench: from sawing round holes in the side trusses of the product to its final assembly
Make a template for the armrest racks and use it to grind two parts on the lathe. At their ends, also provide for the presence of bosses of the above diameter. With the help of bosses, the racks are securely attached to the bench seat and armrests. To determine the position of the racks helps a joiner square, as well as a segment of the electrode sharpened from both ends.
Attach the seat with screws to the side parts and to the support bars. Drill holes for bosses of the same diameter in the seat and backrest. Assemble the armrests by seating the individual elements on PVA glue. Install the back of the bench and fasten it with screws. Between the sidewalls, insert a padding that will increase the rigidity of the structure. For the same purpose, under the seat on the front side of the product, attach a curved bar, sawn along the patterns. Do not forget to process the curved strip on the mill and grind.
After assembling the bench, eliminate all roughness with sandpaper. Then apply a protective agent to the surface of all parts of the bench. The last chord will be the operation of applying two layers of varnish. The manufacture of more elegant products must be ordered from professional craftsmen who know how to make a carved wooden bench using various techniques and technologies.
And also, you can build a round garden bench around a tree, read about it: //diz-cafe.com/ideas/skamejka-i-stol-vokrug-dereva.html
Option # 4 - stationary bench made of gabions
Near the retaining walls made of gabions or cast from concrete, benches built from similar materials look good.

Wooden benches expertly built into the structure of the retaining wall made of gabions, which are metal mesh containers filled with large decorative stone
In their manufacture, one or two gabions are installed - mesh containers filled with decorative stone. Before filling, a metal frame is inserted into the gabions, to which wooden bars or solid seat boards are then screwed. By varying the height of the gabion supports, you can build benches of different heights so that it is convenient not only for adults, but also for children.
You can also learn about how to use gabton in landscape design from the material: //diz-cafe.com/postroiki/gabiony-svoimi-rukami.html

But the garden bench with wrought iron elements looks good, but is difficult to make with your own hands. Forged items are best ordered at a specialist workshop.
Option # 5 - a simple bench from a non-planed board
Turn on your imagination and come up with more ways how to make a do-it-yourself shop from the above materials. Do not be afraid to experiment. Only objectively evaluate your strength. For example, it’s impossible to make forged benches on your own to a person who does not know the secrets of forging. Therefore, such products are best purchased ready-made or ordered according to your sketch in specialized workshops.